Despite some incredibly warm weather this Thanksgiving weekend some work and even progress was made.
Horn
Well not overly important by itself but when you realize its part of the state safety inspection it goes up a notch in importance with that need to pass looming. As such I started trying to make this work. Having previously lost part of the horn brush that goes into the steering wheel I ordered a new one and started from there. I followed the EXTREMELY helpful instructions I found through the MG Experience BBS which are here http://theautoist.com/tootinhorn.htm. I thought I had issues but this article with picture brought a much clearer understanding. Although I’m not overly confident with my volt meter I check things out and 12V DC were at the end of the horn brush! So why didn’t the horn work? Well it wasn’t grounding, duh! I simply installed the steering wheel center/horn piece and hey presto we have a horn that’s actually quite loud (at least in the confines of my garage). Cool success 1 for the work in under 30 minutes!
Side Marker Lamps
I had one front one that didn’t work at all unless you were pressing on the bulb and one rear one that worked after you tapped the lens. Figured these might be part of the safety inspection also and something easy I could look at while also chatting on the phone.
This also turned out to be pretty simple – the front marker had a dodgy bulb where the glass was coming loose from the bottom part of the bulb. New bulb fixed that nicely. Rear bulb seemed to be the wrong bulb altogether – too small. Again solved with a new bulb which I happened to have as in my early parts ordering I ordered 2 of every possible bulb to have “on hand” for the 77. Another quick win.
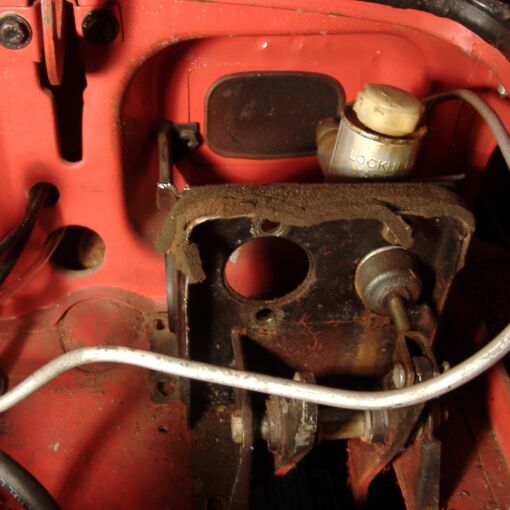
Gas Puking Carbs – Oh Dear
Well I started the engine up – and it was running rough. You could simply tell that all was not well. When switching off but leaving ignition on there’s a liquid sound hitting the floor – yep gas is pouring out the overflow tube! Glad I made up an overflow tube for the car as that much gas coming out anywhere near the manifold would have been way too interesting.
I identified that the gas was overflowing from the front carb and dealt with this by leaving everything until the next day. Was seeing some MG friends and wizards later that night and consoled myself with a nice long and spirited drive in the 77 since the weather was simply gorgeous.
Next day, armed with confirmation of a likely stuck float that was sufficiently stuck a good whack on the carb base wasn’t solving it I decide to delve into the float bowl of an HIF4 for the first time. Fortunately I have a spare set on the shelf which made great reference material – I need good clear pictures and I haven’t found a manual yet that has pictures enough to make sense for me.
I also didn’t want to take the carb off the car and loose all the linkage setup that had been done when the carbs were first installed and tuned so I tackled this installed and made good use of a mirror.
It turned out the float was sticking although I could see why so I ended up removing it. This revealed that the float was about 50% full of gas – OK so that explains the issue. Given that I had a spare set on the shelf I remove the float from the spares and discovered the float needle. In the spare set this dropped out when the crabs were vertical but nothing had come out of the one on the 72. Did I miss it or was it on the floor somewhere? Nope, it was still in place and not moving that much so I tapped and it eventually dropped out.
So now I just cleaned things up and proceeded to put it all back. Easier said than done with the carb on the car and a float needle that no longer wants to stick in place – gravity not on my side this time. Anyway, after several attempts and one or two frustrating moments I got it all back and secured the float and put the bottom float cover back on. Success – no more puking carb and the engine runs and sounds like it should. I will come back to this when another tuning takes place as there was no way to check the float position/height. It does, however work which was the objective – be able to drive the car to the safety inspection.
Interior – Center Console
This is 2 parts – the front piece where a radio can go and then tunnel piece of the console. I simply placed the front section in place and mused the wiring of the cigarette lighter and hazard flashier switch for a while before tackling the tunnel piece of the console. Given the new carpet with sound deadening everything is a tougher fit. I applied my theory of getting things in position and denting the carpet to the console and it seems to work. The extra height of the carpet made the fitting and securing of the 4 screws around the gear shifter somewhat interesting but after making holes in the carpet and with a lot of downward pressure I eventually made it. I was reminded that the short screw of the 4 goes in the front or at the 12 O’clock position as you are sitting in the driver’s seat. I also manage to get the rear screw through the console storage area and into the tunnel so that is looking pretty good.
I will need to go back and play with the leather gear shift boot cover though as that doesn’t stay secured at the bottom. Still that’ll be much easier once the console has bedded in some more.
Overall some more good progress, despite the step back to deal with the puking carbs.

I’ve built this website and spent time on the knowledge base to bring together a lot of information I have collected from around the internet. The intent is making it easy to find rather than having to know about and have skills with search engine query terms to get what you were looking for. Please make use of the knowledge base.


